By Harpal Singh · · 14 min read
To record a software demo, set up a demo account with realistic data, close everything you are not showing, and capture only the window or application you are demonstrating at 4K and 60 frames per second. Narrate from a short list of clicks rather than a script, and pause for a beat after each important click. Then cut the mistakes, check that every click is readable, and export an MP4 shaped for wherever the video will play.
In short:
- Write the click path: five to eight steps from the viewer's problem to your product's result.
- Prepare a demo account with believable data, and silence the computer.
- Capture one window or application, at 4K and 60 FPS if your display allows it.
- Set up a real microphone and decide whether you need the computer's sound.
- Grant the recorder its permissions and watch a 30-second test.
- Record slowly, saying what you are about to do before each click.
- Cut the mistakes, speed up the waiting and check that every click is visible.
- Export in the shape of the place the demo will play.
The rest of this guide is the detail behind each step: the settings to use, an example to copy, and the mistakes that make a demo look amateur. The steps work with any screen recorder. Where ReScreen has a setting for a step, its name is in quotes so you can find it.
What is a software demo video?
A software demo video is a screen recording that shows a piece of software doing a real job, for someone deciding whether to use it. A prospect watching before a sales call, a visitor on your pricing page, a colleague who has to approve a new tool — each of them wants to see the product work, not to learn every menu.
That is what separates a demo from a tutorial. A tutorial teaches someone who already has the software how to finish one task, and it succeeds when they can follow along. The method for those is in how to make software tutorial videos. A demo succeeds when the viewer believes the product solves their problem. The recording technique is almost identical. The pace and the ending are not: a demo moves faster, skips set-up the viewer will never do, and ends on a result and a next step.
Which screen recorder should you use for a software demo?
Any recorder that captures your product clearly will do. What changes from one to the next is how much work the video needs after you stop recording.
| Option | Good for | Watch out for |
|---|---|---|
| macOS built-in (Shift-Command-5, or QuickTime Player) | A quick clip; free and already installed | No zoom on clicks, no styled cursor, and editing stops at trimming and splitting |
| Windows 11 Snipping Tool (Windows key + Shift + R) | Free; records a selected area with your microphone and the computer's sound | No single-window mode, no zoom and no editor |
| Xbox Game Bar (Windows key + Alt + R) | Free; records one app window | Built for games, and cannot record the desktop or File Explorer |
| OBS Studio | Free on Mac, Windows and Linux; scenes, several sources, live streaming | Takes setting up, and the recording is edited in a separate app |
| Cloud recorders such as Loom | A share link seconds after you stop, with viewer comments | The recording is uploaded to the vendor's servers |
| Mac recorders with automatic zoom, such as ReScreen or Screen Studio | A zoom on each click, a readable cursor, a built-in editor and export presets | Paid, and Mac only |
For a demo that a buyer will watch, the question that matters most is whether they can see what you click. The built-in tools record the whole picture exactly as it was, which on a large display means buttons nobody can read in a small player. That is the gap the automatic-zoom recorders exist to close. On a Mac, the roundup of the best screen recorders for Mac compares nine of them by the job you are doing. ReScreen vs QuickTime Player covers when the free option is enough.
What you need before you record
| You need | Why it matters | Good enough |
|---|---|---|
| A recorder that captures one window or area | Keeps notifications, other apps and a second monitor out of the take | Any of the options above |
| A microphone that is not the laptop's | Built-in microphones hear the room and the keyboard | A USB microphone or a wired headset |
| Headphones | Stops your speakers leaking back into the microphone | Any pair you already own |
| A demo account with realistic data | An empty product looks unused; real customer data is a leak | Invented names, plausible numbers, a few weeks of history |
| A click path | Hunting for the next click is what makes a demo drag | Five to eight numbered steps on a sticky note |
| Twenty quiet minutes | One interruption costs you the take | Notifications off, door closed |
A webcam is optional. It earns its place in a founder-led or sales demo, where a face builds trust, and adds little to a short clip on a product page.
Step 1: Write the click path, not a script
Before you open the recorder, write down the shortest sequence of clicks that takes the viewer from their problem to your product's result. Number the steps. Next to the two or three that matter most, write the one sentence you want to say at that moment.
Here is what that looks like for an invoicing app:
- Open Invoices → Overdue. "These are fourteen invoices more than thirty days late."
- Select them all and choose Send reminder.
- Show the reminder preview, with each customer's name and amount already filled in.
- Press Send.
- Open the dashboard. "All fourteen reminders are out, and you can see which ones have been opened."
- Stay on the dashboard and say what the viewer should do next.
Do not write the whole narration. Read-aloud scripts sound read aloud, and your eyes drift to the page instead of the product. A numbered click path with a few anchor sentences keeps you on track and still sounds like you talking.
Most software demos land between one and three minutes. A hero clip on a landing page is shorter. A walkthrough for a buyer who is already evaluating you can run longer, as long as every minute answers one of their questions. Deciding what the demo should argue — which viewer, which outcome, how it opens and how it ends — is covered in how to make a product demo video that converts. This guide concentrates on recording it well.
Step 2: Prepare the demo account and the machine
Most of what makes a recorded demo look professional happens before you press record.
- Use a demo account, never a real customer's. Fill it with believable data: real-looking names, plausible numbers, enough records to look used. Sign in beforehand so no password field or two-factor prompt appears on screen. If the demo has to touch real data, read how to record confidential screens safely first.
- Reset to the starting state. Put every screen back where step one of your click path begins, and open the slow pages once beforehand so the first view of the product is not a spinner.
- Silence the computer. On a Mac, turn on Do Not Disturb from Control Centre; on Windows, turn on Do not disturb from the notification centre. Quit chat, mail and calendar apps too. A notification banner in a demo reads as carelessness, however good the rest is.
- Make text readable at small sizes. Size the window sensibly rather than stretching it across an ultrawide display, and hide the bookmarks bar. Zoom the page to 110–125% so labels stay legible in a small player.
- Tidy what the camera sees, if you are using one: light on your face, nothing behind you that you would not show a customer. ReScreen can remove or blur the room behind you after the take, but good light still does more than any effect.
Step 3: Choose what to capture, and at what quality
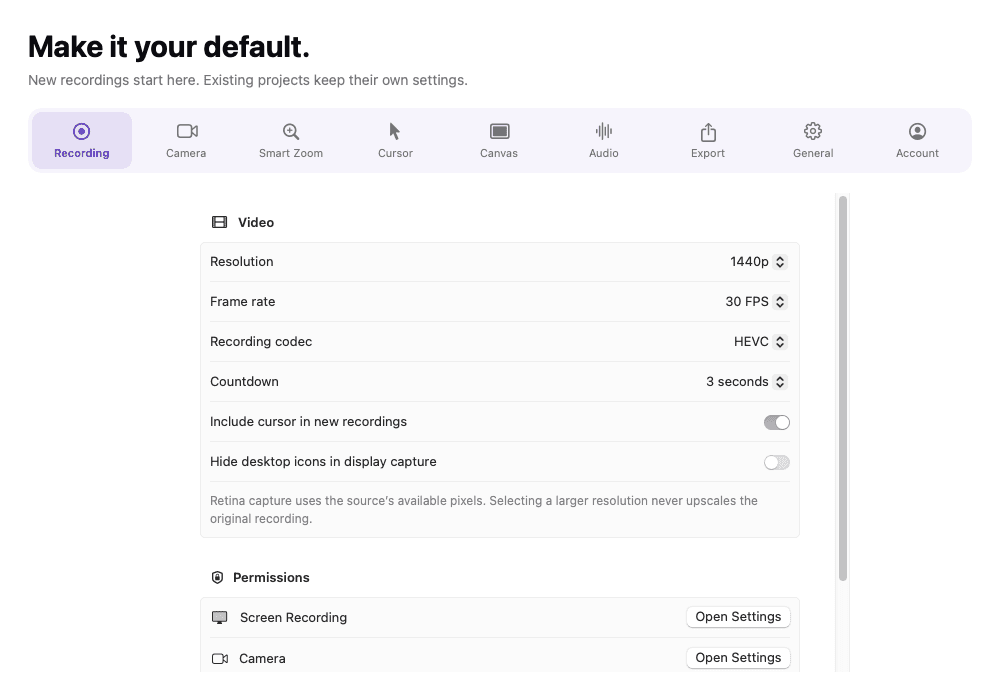
Capture the window or the application, not the display. Recording the whole screen invites every mistake from Step 2 back in. In ReScreen, choose "Window" or "Application" as the source; the recorder's own windows are left out of the capture automatically. If your recorder can only capture an area, as the Windows Snipping Tool does, draw it tightly around the app's window. If you must record the full display in ReScreen, switch on "Hide desktop icons in display capture" in the Recording settings.
Record at 4K and 60 frames per second when the display allows it. A demo is usually watched small — embedded on a page, in a sales email, in a chat thread. The extra resolution is not for viewers with 4K monitors. It is what keeps a button label sharp when the video zooms in on it, and 60 FPS keeps scrolling and pointer motion smooth rather than steppy. File size, codecs and quality levels are covered in the guide to 4K and 60 FPS screen recording on a Mac.
ReScreen ships with a preset called "Product Demo" that sets exactly this: 4K at 60 FPS, with a 1.4× zoom. Apply it from Settings → General → Presets with "Use as Default", or set the resolution and frame rate yourself in the Recording settings. A Retina display is captured at the resolution it really has and never upscaled, so on a smaller screen "4K" means "as sharp as this display goes".
Step 4: Get the microphone right before the first take
Viewers forgive a slightly soft picture. They do not forgive audio they have to strain to hear.
- Switch the microphone on and pick the right one. The "Product Demo" preset leaves the microphone off, because not every demo is narrated. Turn it on before you record, and choose your USB microphone or headset rather than the built-in one.
- Position it once. About a hand's width from your mouth and slightly to one side avoids breath pops. Watch the input meter while you speak at a normal volume: it should move clearly without pinning at the top.
- Decide about system audio. If the product makes sounds that matter, keep system audio on. If it does not, switch it off, so a stray alert never lands on top of a sentence.
- Wear headphones whenever you record your voice and the computer's sound together, so the speakers do not leak into the microphone.
ReScreen records your microphone and the Mac's audio as separate tracks, so a voice that comes out too quiet can be raised later without touching the app's sound. "Reduce background noise" and "Level voice volume" can also be switched on after the take. They are repairs, not a substitute for a good first recording; the details are in how to fix bad audio in screen recordings.
Step 5: Grant permissions and record a 30-second test
On a Mac, macOS asks for permission the first time a recorder uses the screen, the camera and the microphone. Grant them before the real take, not in the middle of it. In ReScreen, the Permissions section of the Recording settings lists each one with a button that opens the right macOS setting. Allow Input Monitoring there too: it is what lets the app see your clicks, and without it the recording still works but automatic zoom and click effects do not.
Then record thirty seconds of the first two steps of your click path and play it back. Check three things: the right window is in the frame, your voice is clear over the product's sound, and the text is readable at the size the video will be watched. Fixing any of these now costs a minute. Discovering them after a clean ten-minute take costs the take.
Step 6: Record the take
Start recording with ⌥⌘R or from the menu bar. The countdown gives you a moment to put your hand back on the mouse. Then:
- Open with the problem and close with the next step. Decide both lines before you start. For example, open with "If you still chase late invoices by hand, here is the one-minute version" and close with "Book a call from the link below and we will set it up with your data."
- Say what you are about to do, then do it. "Now I'll send the reminders," before the click, lets the viewer look in the right place when it happens.
- Click at about half your normal speed, and pause a beat after each important click. Fast, darting movement is what makes viewers lose the thread, and the pause gives an automatic zoom something to hold on.
- When you fluff a line, stop, stay silent for two seconds and say it again. Do not restart. The silence makes the mistake easy to find when you scrub back through the take.
- Pause between sections if you need to think. ⌥⌘P pauses and resumes without ending the take, and the paused time is cut out of the recording.
- If the take has gone wrong from the start, choose "Save take and restart" from the floating toolbar's menu. The first attempt is kept and a fresh one begins.
You do not need a perfect take. You need a complete one with clean moments to cut between. Most people get there on the second or third attempt.
Step 7: Trim, speed up and check the zooms
Stopping the recording opens it in ReScreen's editor. Work in this order:
- Cut the mistakes. Put the playhead at the start of a stumble and press "Set In", move to its end and press "Set Out", then "Remove Range". The rest of the timeline closes up behind the cut, so there is no gap to tidy. "Keep Range" trims the dead air at the start and end in one go.
- Speed up the waiting. Split either side of a loading screen or a long form with ⌘B, select that section and set its speed to 2× or 3×. The wait costs the viewer a second instead of ten.
- Check every zoom. Smart Zoom turns the clicks, drags and scrolls you recorded into zoom blocks. Delete any that point at something unimportant, and add a manual zoom on the result screen if the number that proves your point deserves a close-up. Recommended values for demos are in Smart Zoom settings explained.
- Make the pointer easy to follow. A larger cursor, a little smoothing and a visible click effect help anyone watching without sound. Why this matters so much is covered in why viewers can't see what you click.
- Watch it once on your phone, muted. If you cannot follow the story from the picture alone, a zoom or a click effect is missing. Add it, then stop editing.
The same Smart Zoom controls live in Settings, where they set the starting point for every new recording, with a live preview of the result beside them:
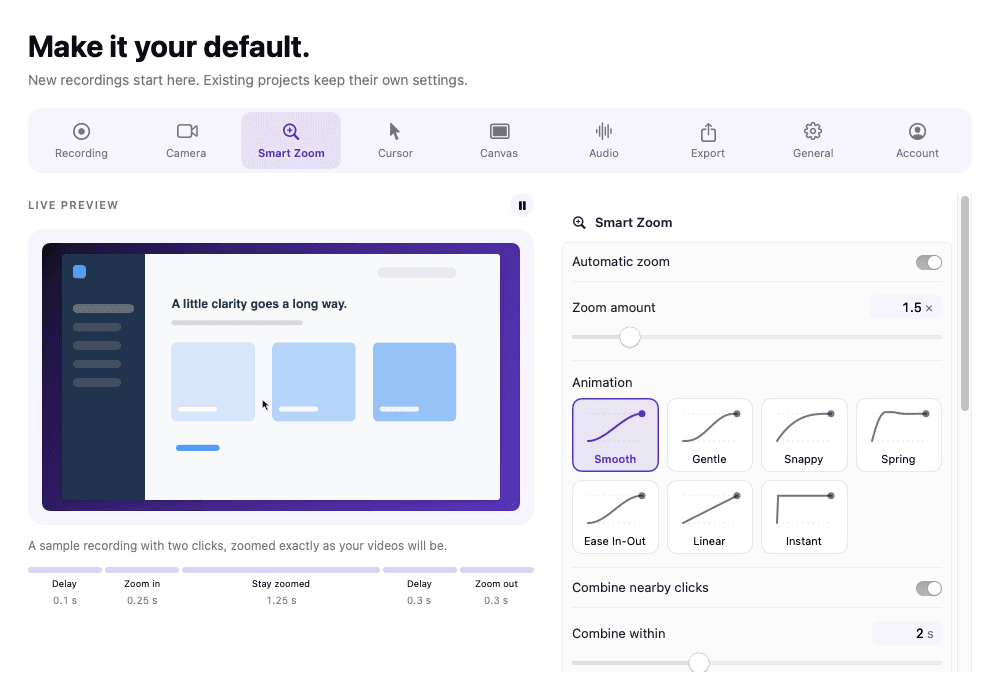
Every change autosaves and ⌘Z undoes any edit, so it is safe to experiment. Titles, captions and music are not part of ReScreen; add those in another editor or on the platform where the video will live.
Step 8: Export for where the demo will play
Export with ⌘E and pick the destination rather than guessing at sizes:
- Website, sales email or YouTube: the YouTube, LinkedIn or X destination gives you a 16:9 H.264 MP4, which plays everywhere.
- Social feeds: the Shorts, Reels or TikTok destination reframes the same edit to 9:16 and follows your clicks, so you never record the demo twice. The details are in the guide to vertical screen recordings for Shorts, Reels and TikTok.
- Quality: "High" suits almost every demo. Save "Maximum" for a file that will be edited again somewhere else.
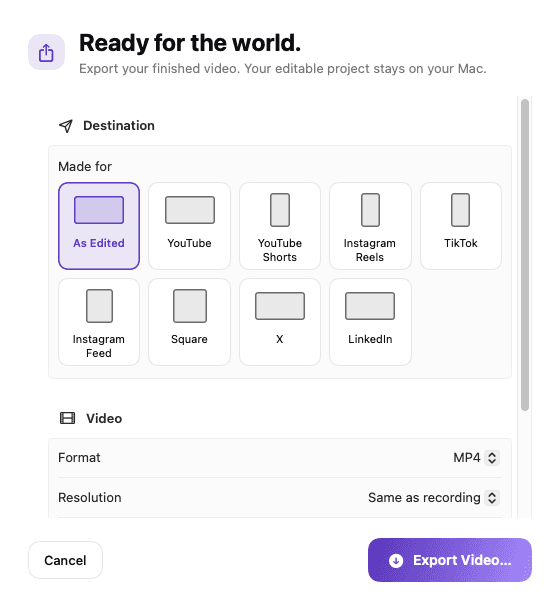
If you only need to send the raw take straight away, ReScreen also writes a ready-to-play MP4 beside the project the moment you stop recording, without the zooms and styling. ReScreen does not host video, so upload the finished file to your site, YouTube or whichever video host your team uses.
Common mistakes when recording a software demo
- Recording the whole display. Notifications, bookmarks and a second monitor all end up in the video.
- Opening on the login screen. Open on the problem. Every viewer has seen a login screen before.
- Clicking at full speed. What feels slow while you record looks normal to someone seeing the product for the first time.
- Moving the mouse while talking about something else. The eye follows motion, so the pointer should be still whenever it is not the point.
- Showing every feature. Six features at equal volume means none of them lands. Record one demo per outcome.
- Trusting the built-in microphone. It is the cheapest upgrade on this whole list.
- Editing for an hour. Cut the mistakes, speed up the waits, check the zooms, export. A demo that ships this week beats a flawless one next month.
Next step: record a 60-second test today
Pick one outcome, write a six-step click path like the example above, and record only the first minute with the settings in this guide. Play it back on your phone. That minute will tell you what the full take needs.
ReScreen puts every step of this guide in one app: the "Product Demo" preset, window capture, automatic zoom, the editor and the export destinations. The product demo video page shows how they fit together. It runs on macOS 13 Ventura or later, on Apple Silicon and Intel, and every plan includes every feature with no watermark. Compare the options on the pricing page, then download ReScreen and record your first demo.
Filed under